![]() Raspberry Pi Sense HAT
Raspberry Pi Sense HAT
Go4Code
Introduction
The Sense HAT is an add-on board for the Raspberry Pi. It gives us the ability to measure all kinds of things with the Raspberry Pi, make games and display things with the LED lights. Let’s firstSe go through what is actually on the board!
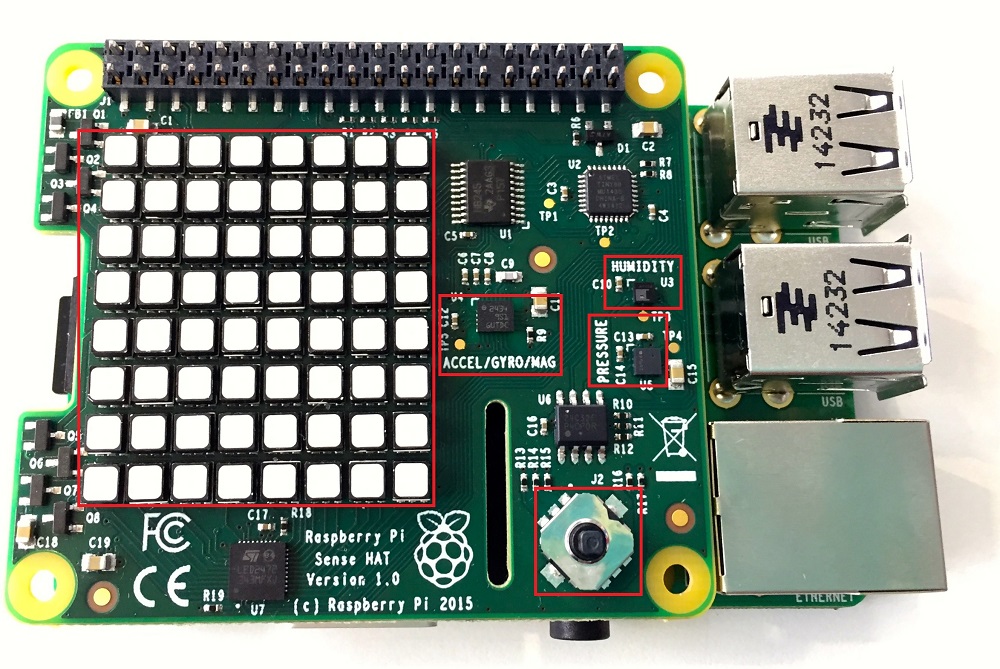
The Sense HAT: The main features are outlined in red.
Features:
-
The LED Matrix on the left has 64 (LEDs) arranged in an 8 x 8 grid. They can be used to display shapes, icons and messages. The screen is one of the ways the Raspberry Pi can communicate with us, which is very important for making games!
- The small microchip labelled ACCEL/GYRO/MAG is what is known as the inertial measurement unit (IMU). This actually has three sensors!
- The first sensor is the accelerometer. This measures how acceleration and will be useful in detecting how fast the Raspberry Pi has been moved.
- The second sensor is a gyroscope. This sensor basically measures if the Raspberry Pi has been rotated. We can measure rotation in three directions, but more on this later.
- The third sensor is a magnetometer. This measures the magnetic field and can be used to detect the magnetic field caused by the rotation of the Earth.
- Next is a humidity sensor. This will allow you to measure air moisture. It’s the small chip just below the text HUMIDITY. You can also use it to measure ambient temperature.
-
There is also a pressure sensor for measuring air pressure, something which is certainly important in space. It’s the chip to the right of the text PRESSURE.
- Last but not least is the joystick. The Raspberry Pi cannot be connected to a USB keyboard or mouse in space, so the Sense HAT has its own five button joystick. This is the silver rectangle in the bottom right corner with the small stick poking out of the top. It can move up, down, left, right, and allow middle-clicks.
These simple features allow us to do countless things with the Sense HAT, we have come up with a few projects that you will do. To let you really express your imagination and creativity, you get to keep the Sense HAT and Raspberry Pi so you can come up with your own gadgets!
The Assembly
This section is optional. You may skip to the next section
The Sense HAT is just one type of HAT (Hardware Attached on Top) that you can get for your Raspberry Pi. Some more examples of HATs are listed here.
The Sense HAT you have for the summer school has been preassembled by the Go4Code team. But if you wanted to take it apart and use a different HAT, it would be good to know how it is put together.
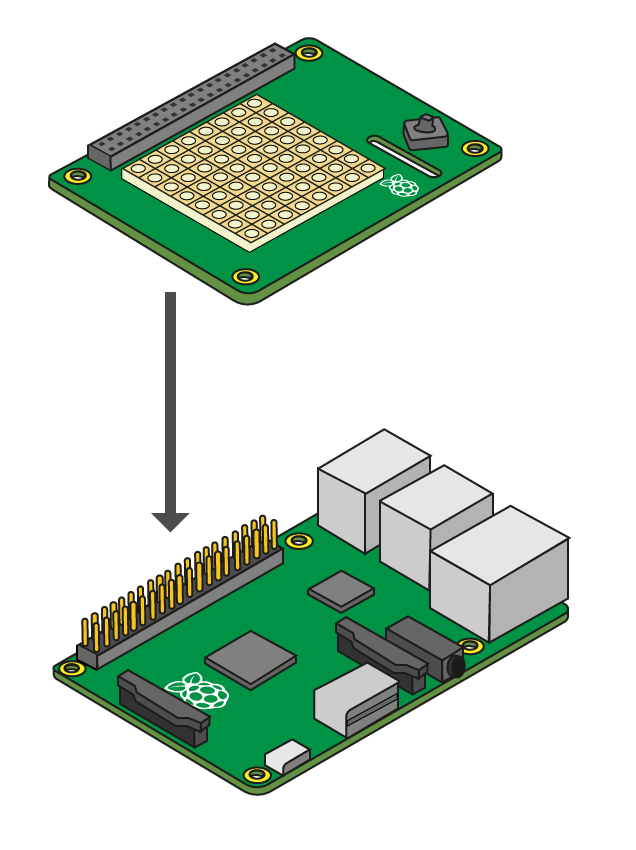
The Sense HAT Assembly
- The Sense HAT connector is first attached into the GPIO pinouts on the Raspberry Pi (the golden pins in the image above).
- Then four hexagonal stands are placed between the Sense HAT and the Raspberry Pi on circular holes.
- These stands are then screwed on to securely attach the Sense HAT to the Raspberry Pi
Programming the Sense HAT
We will be using the Python programming language to write code that will run on the Raspberry Pi and control the Sense HAT. This guide will take you through the basics of Python programming.
The end goal is to get you ready to start doing some programming of your own, in the various projects we have prepared for you.
We start right from the beginning, so you don’t need to have done programming before. If you have, then use this guide as a helpful reminder.
 The Trinket Emulator
In your projects, you’ll have your own Sense HAT to play around with. But since you’ll have to test around and tinker with your projects for quite some time before its ready, we’re going to be testing all our code on a virtual Sense HAT on a website called Trinket.
In your project scripts you will get a trinket page to test and develop your code before you transfer it on the the Raspberry Pi.
We have embedded the Trinket Emulator into this document so you can learn to code here before you start developing your own code.
Trinket Emulator
The left side of the page has some Python code already. The right side of the page shows nothing in the beginning, but if you press the Run button ![]() in the top left corner, a virtual Sense HAT should appear on the screen. The code in the there right now just starts the Sense HAT, but doesn’t actually tell it to do anything. Let’s create out first program!
in the top left corner, a virtual Sense HAT should appear on the screen. The code in the there right now just starts the Sense HAT, but doesn’t actually tell it to do anything. Let’s create out first program!
1. Showing Messages
In this section we will go over showing messages on the Sense HAT. You should use the Emulator below to test out the code.
Trinket Emulator
Copy the following into the Python code pane in the Emulator above:
sense.show_message("Hello world!", 0.05)
After you have done that, click Run again. The message, “Hello World!” should scroll by on the screen. You’ve written your first Python program! You’re now officially a Python programmer.
The red text you see in the Python code is what we call a string. A string is basically a piece of text. In Python, we can write strings by either enclosing text in double quotation marks like this
"This is a string!"
or single quotation marks, like this
'This is a string!'
The show_message() function (don’t worry if you don’t know what a function is yet, we’ll go over this later) displays whatever string you put inside the bracket, on the Sense HAT.
Now, we’re going to play around with this program that you’ve made.
Exercise 1: Change the message to something else. Try doing it using single-quotation marks as well.
Exercise 2: You might have noticed that there’s a number after the string. Try changing the value of that number. Find out what that number does.
2. Colours in Python: RGB -values
In this section we will be changing the colour of the light emitted by the LEDs.
Run the code in the emulator below:
Trinket Emulator
Run it again, and see what happens. The text should now be red. The last part of the line that you just wrote text_colour=[255, 0, 0] decides which color the text should be in. You can change these three numbers to change the color of the text. The numbers in the square brackets specify the colour of the light emitted from the pixel.
We call triplets of numbers that specify colour RGB-values, and this is the reason:
- The first number decides how red the light should be,
- the second number decides how green the light should be,
- and the third number decides how blue the light should be.
The pixels on the Sense HAT are made up of tiny LEDs that emit red, green and blue light. You may remember from the talk that light is made up of different colours and that we can combine light of different colours to make new colours.
The maximum redness/greenness/blueness in RGB format 255, and the lowest is 0. As you saw above, the RGB-value for red is [255, 0, 0]. And, for example, the RGB-value for black is [0, 0, 0]. Note: the pixels won’t actually show black as there is no such thing as black light. Black is just the lack of light. By entering an RGB value of [0,0,0] we just turn the LEDs off.
We can also set the back colour using the code below. Replace the show_message() function in emulator with the one below:
sense.show_message("Hello world!", 0.05, text_colour=[255, 0, 0], back_colour = [0,255,255])
Use what you have just learnt to complete the exercise below. Your code should go in the Trinket emulator above. If you don’t understand something, feel free to ask your supervisor.
Exercise 3: Make the text flash by in the following colors:
- Red
- Blue
- Green
- White
- Purple
- Yellow
- Orange
You’ll have to experiment with the RGB-values to try to find the right color-combinations!
Commenting
Before we get going with some more interesting code, let’s remove the sense.show_message line so that it won’t disturb us later on. But instead of just erasing the line completely, we can comment it out.
To do this, simply add a hashtag # at the start of the line, like this:
# sense.show_message("Hello world!", 0.05, text_colour=[255, 0, 0])
Try running the code after you’ve commented the code out. No text should appear on the screen. In Python we often use comment symbol # to add explanations to our code, for example:
# This line displays some text on the screen
sense.show_message("Hello world!", 0.05, text_colour=[255, 0, 0])
3. Functions
Before we move on, I’ll explain (as promised) what a function is. A function is simply something that we use in a code to do something for us. For instance we used the show_message function earlier to display text on the Sense Hat’s LED matrix.
Let’s look a bit closer at the show_message function.
sense.show_message("Some String", 0.05, text_colour = [255,0,0],back_colour = [0,255,255])
The name of the function is show_message. When you use a function, it’s often referred to as calling the function. We are calling the function on our Sense HAT (we have named the Sense HAT sense) by writing sense.show_message.
What about all those numbers inside the brackets? Those are called arguments. Sometimes when we call a function, we want to specify exactly what we want it to do, we do this using arguments.
In this case, the arguments are: the message that will be displayed on the screen, the scroll speed of the message, the text colour and the back colour.
Don’t worry if all of this sounds a bit complicated. It’s a lot of names for something that’s quite simple. If you have any questions about this, discuss it with a supervisor.
Before we move on, we’ll introduce the print function. The print function is very simple, it just displays some text. The important difference here is that it doesn’t print out text on the screen, but in the terminal underneath the Sense HAT screen on Trinket. It is easiest for you to see for yourself:
Trinket Emulator
You should see some text appear in the lower-right corner of the page. Try changing it to make it print something else.
4. Using Python as a calculator
Trinket Emulator
Next thing we’ll do is try out some simple mathematical operations in Python. All the main maths signs you know from school exist in Python. Using Python we can add, subtract, multiply or divide numbers. Copy the following code into the emulator above to try it for yourself:
print(3+5)
print(2-7)
print(2*5)
print(4/2)
Run the code and see what the results are. You can also add really large numbers
print(1234567890000 + 987654321111)
Or do several mathematical operations in a row
print(23*52*13 + 52*611 - 412 )
We can also use brackets ”()” when calculating things
print((2+3)*5)
print(6 + ((100 - 1)*42)/32)
print(((2 * (23 - 3) / (12 * 23)) - 32)*62)
Try changing the numbers, and try to do different calculations.
Exercise 4: In Trinket, translate the following into Python code:
_(four times ( six minus two ) plus five) divided by two_
and use print to show the result.
5. Variables
Trinket Emulator
Python allows us to store information in variables. We can use the assignment operator (the equal-to sign ‘=’) to assign a value to a variable.
There are three components to variable assignment.
- First we need to decide on the name of our variable, like my_variable.
- Second, we set the variable name equal to something using the equal-to sign ‘=’.
- Third, we write the value that the variable should be equal to.
Like this:
my_variable = 123
We can also store strings in a variable:
my_variable = "Hello!"
Note that the variable name must be written as one single set of characters without spaces. So, for example, my variable would not be a valid name for a variable.
The code below shows how easy it is to define and display a variable.
myNumber = 5*7
someText = "Five times seven is "
myMessage = someText + str(myNumber)

sense.show_message(myMessage, 0.05)
Can you look at this code and figure it out what it does without actually running it? After you have guessed, write the code in the Trinket Emulator above and run it.
Explanation: We have used the str function to convert the number 57 to a *string “35”. Then we added the string “Five times seven is “ with “35” to form “Five times seven is 35”.
Exercise 5: Write a program that displays your full name and age on the screen. Store your full name in a variable called myName, and store your age in a variable called myAge. Remember that you have to convert numbers to strings using the str function.
6. A basic program
Variables are quite useful, as they allow us to remember numbers (or other types of data, like strings) in terms of more memorable variable names. We can use these variables in our programs to compute things. In the Trinket below is an example of a basic program that calculates how many minutes there are in a week.
Trinket Emulator
You don’t have to copy this code, you can go on the following link to see the code in action: https://goo.gl/CZH1UX.
But before you run it, try to just read the code and figure out what it does yourself. It’s good practice and will help you become a better programmer!
Exercise 6: Alter the code in the Trinket above to show the number of minutes in a week on the Sense Hat’s display. Hint: the show_message function displays messages given as strings.
7. Drawing stuff on the Sense HAT: sense.set_pixel
It’s really easy to draw things on the Sense HAT screen. We can do this using the function sense.set_pixel Try adding the following lines to your code in the emulator.
sense.clear()
sense.set_pixel(2, 2, 255, 255, 255)
sense.set_pixel(4, 2, 255, 255, 255)
sense.set_pixel(3, 3, 255, 255, 255)
sense.set_pixel(2, 4, 255, 255, 255)
sense.set_pixel(4, 4, 255, 255, 255)
Trinket Emulator
It should draw a white cross on the screen. The first line, sense.clear, resets all the pixels on the screen to black. This is just to avoid any clutter on the screen if you make mistakes.
Let’s see how the sense.set_pixel function works.
You’ll recognize the last three numbers of each line, those set the colors, as we learned previously. The first two numbers decide where we’ll draw the pixel.
The first number is what column on the screen the pixel should be drawn at. We usually call this the x-coordinate.
The second number is what row on the screen the pixel should be drawn at. We usually call this the y-coordinate.
Exercise 7: Play around with the code, and try do draw something of your own. Maybe the first letter of your name?
Exercise 8: Try placing the sense.clear() line at the end of the code. What happens? Can you explain why? After that, place the line in the middle of the code. Again, what happens, and can you explain why that happens?
8. If-and-else statements
This next part is where things get more interesting (and a bit more complicated)!
The if-statement allows us to make a program that reacts in different ways, under different conditions. Think of it as a way to ask a computer questions.
Look at the code below, can you guess what it does?
myName = "Lukas"

if myName == "Ishan":
  sense.show_message("Your name is Ishan", 0.03)
else:
  sense.show_message("Your name is not Ishan", 0.03)
Copy the code into your project. How can you change the variable myName so that the result of the program is different?
Note that the code inside the if and the else clause are indented (2 spaces away from the left), the indentation tells the computer which parts of the code are inside the ‘if’ and the ‘else’ statements. To add an indentation to your code, press the Tab key on your keyboard.
Essentially, the if-statement checks whether something is true or not. The dobuble-equals sign “==” means “is equal to”. So the code above translates to (in English):
If *myName* is equal to "Ishan", show "Your name is Ishan". If *myName* is
not equal to "Ishan", show "Your name is not Ishan".
The code that is in the true part of the code, is on the lines below the if. The code that is in the false part of the code, is on the lines below the else.
We can also create if-statements using numbers like in the Trinket below. Before running it, read the code and guess what it does.
Trinket Emulator
In the code above, we were able to compare numbers in the if statements using the <, > and == symbols. Here’s an explanation for what these symbols mean:
- a > b a is greater than b.
- a < b a is less than b.
- a >= b a is greater than or equal to b.
- a <= b a is less than or equal to b.
- a == b a is equal to b. We use double equals because single equals is used to assign values to variables.
This is all quite a lot of information already, so if you find it confusing, try to discuss it with a supervisor or the person sitting next to you. Don’t worry if you don’t understand everything yet!
Exercise 9: In the Trinket below write a program that does the following:
- Define a variable called myNumber, and assign it any number you like.
- Using if-statements, make the program say whether the number is positive, negative or equal to zero.
Trinket Emulator
10. Lists
In Python, we can not only store numbers and strings in variables, we can also store a list of items in a variable.
myList = [42, 51, 62, "Hello", 61, 123, "World"]
We already saw a list early on in the lecture. The RGB colors were stored in lists.
If we want to access individual elements in the list, we can do it like this:
myList = [42, 51, 62, "Hello", 61, 123, "World"]

# The first element in the list
print(myList[0])

# The third element in the list
print(myList[2])

# The fifth element in the list
print(myList[4])
Copy this code and see what it does. Note that the first element is given by the number 0 in the list, and the second by 1 and so on…
Trinket Emulator
Exercise 10: In the Trinket below repeat Exercise 7, but instead of storing your name and age is separate variables, store them in a single list.
Trinket Emulator
11. For-loops
Sometimes you might want to repeat the same piece of code several times. Loops allow us to accomplish this in fewer lines of code, by repeating code until our operation is complete.
Look at the code below, what do you think it does? See if you can figure it out before you run it.
for n in range(1,10):
  print("The number is", n )
Now copy the code and run it. Did you guess correctly?
How about this code?
for n in range(1, 5):
  sense.set_pixel(n, 0, 0, 0, 255)
This one is more complicated. Try to imagine what this could do. After that, copy it and see for yourself.
Play around with the code and see if you can make it do more complicated!
Exercise 10: Write a program that prints the numbers from 50 to 100.
Trinket Emulator
Exercise 11: Write a program that draws a line of yellow pixels from the top-left corner, to the bottom-right corner.
Trinket Emulator
12. While-loops
Another type of loop that we can use in Python is the while loop.
The while loop repeats its code as long as the expression after the while command evaluates to true. You can think of it as a mix between an if-statement and a for-loop.
The previous explanation might be a bit complicated to follow, but if you look at the code below you can see that it’s quite intuitive.
n = 0 # Initialising n
while n<10: # Starting the loop with condition that n must be less than 10
    n = n+1 # redefines n as n+1
    print(n) # print the new value of n
As usual, look at the code and try to figure out what it does. After that copy it and see for yourself!
What do you think will happen if you run the following code?
while True:
  print("Hello!")
Don’t try to run it! What will happen is that the code will run forever, can you see why? It’ll print out “Hello!” again and again and it wont stop! Although never-ending codes like this might seem useless to you, it does actually come in handy, and we’ll often use them in our projects!
Exercise 12: Redo exercise 10, but with a while-loop, instead of a for-loop.
Trinket Emulator
13. What’s next?
The next thing is to ask yourself if you’ve understood everything! We covered quite a lot, and very quickly, so it might be worth to just have a quick read-through of everything again.
After that, it’s time to start choosing a project. You should try to start off with one of the easier projects, before attempting any harder ones. Remember that you can always ask for help within your group, or by a supervisor, during the entirety of the summer school.
We discussed some useful functions in this lecture, like sense.set_pixel and print. There are many more functions you can use, and the best way to check them all out is by reading the Function Reference document. Use that document as a reference on how to use various Python functions.
Good luck!
Authors: Lukas Kikuchi & Ishan Khurana
Date: August 09, 2017
Copyright (c) 2017 Go4Code All Rights Reserved.